
AVerMedia Webcam Support
Using AVerMedia Webcam
- The webcam is compatible with leading conferencing platforms: Zoom®, Microsoft Teams®, Google Meet®, Skype®, Cisco Webex®.
- AVerMedia Webcam does NOT require driver installation, however, we recommend you install the CamEngine app to experience all advanced features and settings.
- CamEngine is designed specifically for AVerMedia’s webcam series. CamEngine allows you to customize video settings and access the full suite of features the webcam has to offer.
Download
CamEngine System Requirement
CamEngine 4 System Requirements (PW515) Windows
OS: Windows 10, 11
Display: 1024 x 768 or higher resolutionDesktop
Usage
CPU
GPU
Image Adjustment,
Picture in Picture,
Skin Filter,
AR Effect,
AI Framing
Intel® Core™ i5 6th or better
NVIDIA® GeForce® GTX 1060 or better
NVIDIA® Virtual Background
Intel® Core™ i5 8th or better
NVIDIA® GeForce RTX 20 or 30 Series, or NVIDIA® RTX professional GPUs, or NVIDIA® Quadro RTX
Intel® Virtual Green Screen
Intel® 11th Gen Core CPU
Intel® graphics
RAM: 8 GB or more
Laptop
Usage
CPU
GPU
Image Adjustment,
Picture in Picture,
Skin Filter,
AR Effect,
AI Framing
Intel® Core™ i7 7th 2.8GH 4 core or better
NVIDIA® GeForce® GTX 1050 Ti or better
NVIDIA® Virtual Background
Intel® Core™ i5 8th 3GH 6 core or better
NVIDIA® GeForce RTX 20 or 30 Series, or NVIDIA® RTX professional GPUs, or NVIDIA® Quadro RTX
Intel® Virtual Green Screen
Intel® 11th Gen Core CPU
Intel® graphics
RAM: 8 GB or more
CamEngine 4 System Requirements (PW515) Mac
OS: macOS 10.15, 11, 12
Display: 1280 x 800 or higher resolutioniMac 2017
CPU
GPU
3.8GHz quad‑core Intel Core i5 or better
AMD Radeon™ Pro 580 or better
RAM: 8 GB or more
Macbook Pro 2019
CPU
GPU
2.6GHz 6‑core Intel Core i7 or better
AMD Radeon™ Pro 5300M or better
RAM: 8 GB or more
Desktop
Usage
CPU
GPU
Image Adjustment,
Picture in Picture
Intel® Core™ i5 6th or better
Intel® UHD integrated graphics or better
Share screen by Teams
Intel® Core™ i5 6th or better
NVIDIA® GeForce® GTX 1060 or better
RAM: 8 GB or more
Laptop
Usage
CPU
GPU
Image Adjustment,
Picture in Picture
Intel® Core™ i5 10th 1.6GHz 2 core or better
Intel® UHD integrated graphics or better
Share screen by Teams
Intel® Core™ i7 7th 2.8GH 4 core or better
NVIDIA® GeForce® GTX 1050 Ti or better
RAM: 8 GB or more
Desktop
Usage
CPU
GPU
Image Adjustment,
Picture in Picture
Intel® Core™ i5 6th or better
Intel® UHD integrated graphics or better
Skin Filter,
AR Effect
Intel® Core™ i5 6th or better
NVIDIA® GeForce® GTX 1060 or better
Share screen by Teams
Intel® Core™ i5 6th or better
NVIDIA® GeForce® GTX 1060 or better
RAM: 8 GB or more
Laptop
Usage
CPU
GPU
Image Adjustment,
Picture in Picture
Intel® Core™ i5 10th 1.6GHz 2 core or better
Intel® UHD integrated graphics or better
Skin Filter,
AR Effect
Intel® Core™ i7 7th 2.8GH 4 core or better
NVIDIA® GeForce® GTX 1050 Ti or better
Share screen by Teams
Intel® Core™ i7 7th 2.8GH 4 core or better
NVIDIA® GeForce® GTX 1050 Ti or better
RAM: 8 GB or more
Desktop
Usage
CPU
GPU
Image Adjustment,
Picture in Picture
Intel® Core™ i5 6th or better
Intel® UHD integrated graphics or better
Skin Filter,
AR Effect,
AI Framing
Intel® Core™ i5 6th or better
NVIDIA® GeForce® GTX 1060 or better
Share screen by Teams
Intel® Core™ i5 6th or better
NVIDIA® GeForce® GTX 1060 or better
NVIDIA® Virtual Background
Intel® Core™ i5 8th or better
NVIDIA® GeForce RTX 20 or 30 Series, or NVIDIA® RTX professional GPUs, or NVIDIA® Quadro RTX
RAM: 8 GB or more
Laptop
Usage
CPU
GPU
Image Adjustment,
Picture in Picture
Intel® Core™ i5 10th 1.6GHz 2 core or better
Intel® UHD integrated graphics or better
Skin Filter,
AR Effect,
AI Framing
Intel® Core™ i7 7th 2.8GH 4 core or better
NVIDIA® GeForce® GTX 1050 Ti or better
Share screen by Teams
Intel® Core™ i7 7th 2.8GH 4 core or better
NVIDIA® GeForce® GTX 1050 Ti or better
NVIDIA® Virtual Background
Intel® Core™ i5 8th 3GH 6 core or better
NVIDIA® GeForce RTX 20 or 30 Series, or NVIDIA® RTX professional GPUs, or NVIDIA® Quadro RTX
RAM: 8 GB or more
Desktop
Usage
CPU
GPU
Image Adjustment,
Picture in Picture,
Skin Filter,
AR Effect,
AI Framing
Intel® Core™ i5 6th or better
NVIDIA® GeForce® GTX 1060 or better
NVIDIA® Virtual Background
Intel® Core™ i5 8th or better
NVIDIA® GeForce RTX 20 or 30 Series, or NVIDIA® RTX professional GPUs, or NVIDIA® Quadro RTX
RAM: 8 GB or more
Laptop
Usage
CPU
GPU
Image Adjustment,
Picture in Picture,
Skin Filter,
AR Effect,
AI Framing
Intel® Core™ i7 7th 2.8GH 4 core or better
NVIDIA® GeForce® GTX 1050 Ti or better
NVIDIA® Virtual Background
Intel® Core™ i5 8th 3GH 6 core or better
NVIDIA® GeForce RTX 20 or 30 Series, or NVIDIA® RTX professional GPUs, or NVIDIA® Quadro RTX
RAM: 8 GB or more
F.A.Q.
- How do I enable auto framing?
There are two methods:
Method #1. By hand gesture:
You may turn on auto framing by hand gesture. Just hold your right or left hand with your palm facing the webcam for three seconds until the power indicator flashes twice. Taking the following hand gestures for example, use an open hand palm and show number five:

Please show a complete hand palm, without being hidden by shirts.

1.Method #2. By AVerMedia CamEngine software:
To enable auto framing, another way is to use CamEngine software. Please check steps in the video:
AVerMedia 4K Webcam PW515 Tutorial - CamEngine 4
2.How to disable auto framing?
The steps to enable or to disable this feature are the same.
3.How far is the range for hand gesture control? How about the range for auto faming detection?
For hand gesture control: the range is within 1 meter with all human upper bodies covered.
For auto framing: detection range is within 3 meters with all human upper bodies covered.
4.When auto framing is enabled and webcam has zoomed in, how to set back to the widest range?
When there is no one within camera’s field of view, it will reset to the widest range by default.
1. How to enable HDR, high dynamic range?
It can be activated by AVerMedia CamEngine software. After installing CamEngine, go to: “Video” -> “Advanced” -> “High Dynamic Range”:

2. How to enable audio noise reduction?
It can be activated by AVerMedia CamEngine software. After installing CamEngine, go to: “Microphone Settings” -> “Noise Reduction”:

3. Auto framing, HDR, and audio noise reduction - feasibility of PW515’s multiple functions:
These functions can be activated with only one for each at the same time. Once one of these functions is turned on, the other two will be turned off automatically.
For example, if you enable auto framing, alternatively, HDR and audio noise reduction will be turned off.As indicated in the chart below, the symbol, “X”, means these two functions selected in chart cannot be enabled at the same time:
HDR
Facial
Exposure
Auto / Manual
Exposure
Manual Focus
Auto Framing
Manual Framing / Field of View
Audio Noise Reduction
HDR
X
X
Facial
Exposure
X
X
X
Auto / Manual Exposure
X
Manual
Focus
X
Auto
Framing
X
X
X
Manual
Framing /
Field of View
X
X
Audio
Noise Reduction
X
X
CamEngine 4 with Intel® Virtual Green Screen is suitable for personal recording or online lesson delivering.
Please refer to the tips below before use:
1. To get the best effect, ensure your actual background as simple as possible. There should be only one person in webcam’s field of view.
2. The initial setup takes about 1-4 minutes at the first time. And then, every time when virtual background is enabled on CamEngine 4, it takes about 3 seconds. The time taken is for Intel® Virtual Green Screen to produce background cache initially, and to match the cache afterwards.
3. System requirement includes Intel® 11th Gen Core CPU and Intel® graphics or later.
This guide explains how to troubleshoot issues you may encounter while using CamEngine. The below lists provide a quick overview:

Software
- Try closing other software applications.
- Try adjusting your webcam's resolution or frame rate in both CamEngine and any other app that's using your webcam's video.
Power Supply Setting
- In the Power Options window, find Select a Power Plan, then select High Performance. If you are using a laptop make sure it's connected to a power supply.
System Requirements
- Windows 10(64-bit), Intel or AMD CPU
- macOS 11.0, Intel or Apple CPU
- NVIDIA® GeForce® GTX 1060 or above(advanced properties); RAM: 8GB or more
STEP 1. Type sound settings in the search box on taskbar.
STEP 2. Select Choose your input device

STEP 3. Click on Sound (left side), under Input (right side) choose your input device: Microphone (Live Streamer CAM313 Microphone). Test your microphone to make sure it is working.

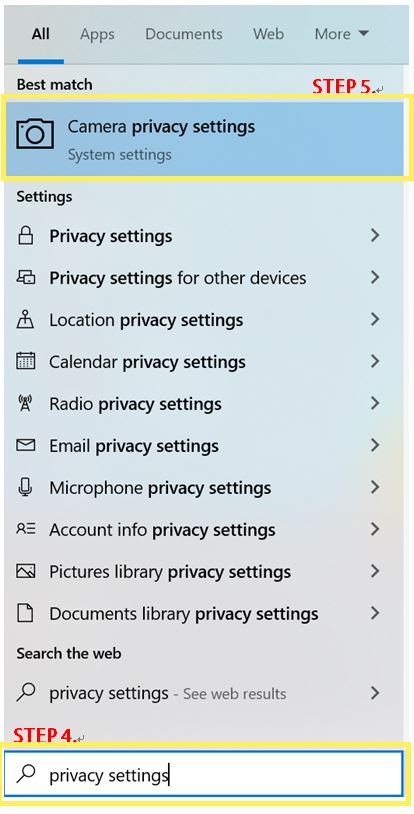
STEP 4. Type privacy settings in the search box on taskbar.
STEP 5. Select Camera privacy settings. Later, return to select Microphone privacy settings.
STEP 6. Make sure Allow apps to access your camera is set to On.
STEP 7. Type privacy settings in the search box on taskbar.
STEP 8. Select Microphone privacy settings.


Step1. Check if CAM313 appears on the USB Device Tree.

Step 2. Access to the Settings
Apple icon -> choose System Preferences from the popup menu.
Click on the icon of Sound, and test if your voice can be detected by CAM 313.
Step 3 .Go to System Preferences, click on Sound

Step 4 .Be sure to checkbox next to Show volume in menu bar

Step 5 .Go to System Preferences, click on Security Privacy

Step 6 .Granted access. Select the checkbox next to the an app to allow it to access the camera.

Step 7 .Granted access.Select the checkbox next to an app to allow it to access. The microphone.

Yes, PW313 is Plug & Play device support for Windows 7 or 8.1. If your webcam isn\'t turning on. Open Device Manager by clicking the Start button and check if your webcam displays in the device manager.
Please note: AVerMedia CamEngine Lite tool only supports Windows 10, doesn’t support Windows 7 or 8.1.
Step 1. Open your preferred video conferencing application.

Step 2. Click on Settings (gear icon) on the top right corner .
Step 3. You will notice the video improvement in the video preview window. Then launch AverMedia Live Streamer CAM 313 tool
 to adjust the brightness / contrast settings.
Step 1. Open your preferred video conferencing application.
Step 2. Click on Settings (gear icon) on the top right corner.

Step 3. Open the AVerMedia CamEngine Lite tool on the top of the screen, and click on [Open]


Step 4. You will notice the video improvement in the video preview window. Then launch AverMedia Live Streamer CAM 313 tool
to adjust the brightness / contrast settings.
Tutorial Videos
Contact us
Submit a support ticket to our Help Desk:*Microsoft Skype, Zoom, and Cisco Webex are registered trademarks of their respective owners.